PORTAL GUIDE
Introduction
This will guide you through the order process. If you ever need any help ordering, feel free to reach out to us at (417) 553-0504 or email us at
support@powershades.com. We are here to help!
Preface

This guide is assuming you've already had an account set up either by your Distributor or Representative.
This guide will not be laid out like our other guides, but instead explaining the different options and what the portal has to offer.
You can reset your password from this page as well, if you ever happen to lose your password. The Portal will automatically send out an email to the email you used to register your dealer account whenever reset.
Navigation
Home Page
Once logged in, you will be met with the Portal Home Page. This may look different depending on your user status and the version of the Portal you're on.
Under the Quotes & Orders portion, you're able to find the status of all your orders which are split into 7 different categories...
All: This displays all quotes and orders.
Active Quotes: These are draft quotes that have been made, but haven't been converted to orders.
Awaiting PO: These are quotes that have converted to an order, but are awaiting either payment or a PO from a distributor.
Awaiting Manufacturing: Once payment has been made or a PO has been received, the order will be sent here.
In Manufacturing: The order will move to this status once it has been processed by the order team.
In Production: The order is now in the production queue.
Shipped Orders: These are orders that have been shipped.
Under the Shipped Orders page you're able to see a different set of actions icons:
If you click the truck icon, you will see a popup displaying the carrier in which your order has shipped through and the tracking number.
Users Page
Here you're able to see all the users within your organization. You can also add users here - this would be used for adding employees to an organization.
Downloads Page
Here you're able to see all the documentation, installation guides, and drivers listed.
Creating a Quote
Clicking on the "New Quote+" on the home page or by clicking "Create a Quote" will take you to the quote page:
You can name the quote anything you'd like under the "Quote Title" box. You are able to add products by the button labeled "+ Shade / Accessories" at the bottom of the page, which will bring up this dialogue box, prompting you to select indoor or outdoor shades. Navigating between the three tabs will allow you to select different products.
Controls
You will see a couple of buttons on the right side - all with different functionality.
Duplicate Quote: This takes everything on a current quote and copies it to a brand new one.
Generate Quote: This generates a PDF for dealers to show their customer(s).
Excel: This generates an excel spreadsheet with all the order information.
Place Order: This converts the quote to an order.
Edit Order: This allows you to edit an order.

All quotes are valid for 90 days without the risk of price changing. Editing the quote will pull current pricing!
Creating an Indoor Shade
Once you have selected indoor shade, you will be met with this dialogue box:
Shade Type
Manual Shades: Shades that must be manually controlled via a pull chain.
Motorized Shades: Shades that can be controlled by RF Remote, over WiFi with an RF Gateway, or using a Third Party Control System and an RF Gateway.
Single or Dual Shade
This is the selection between single or dual shade - the most common will be single shades. However, dual shades may be utilized in instances where you want two separate fabrics. This may be done with one fabric as light blocking fabric for day, and a light filtering fabric for the night. There are many uses for dual shades - it's entirely dependent on the project.
Measurements
This is where you'd enter the width, height, and window jamb depth.
Mount Type
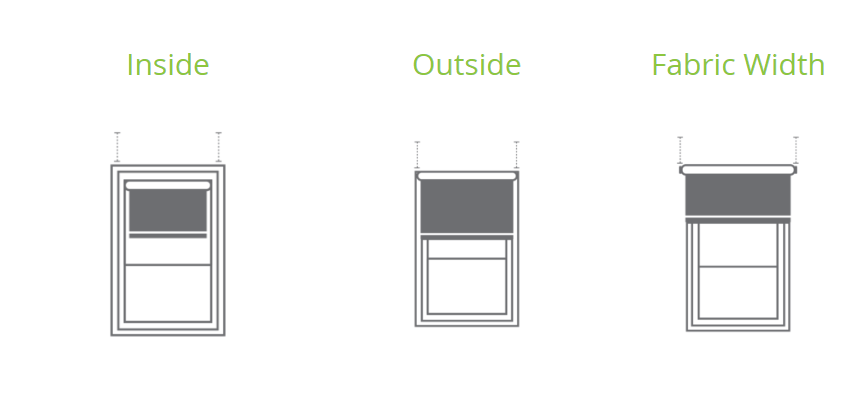
Inside Mount: This is the most common mounting type. With this mounting type, you will be installing the brackets and shade on the inside of the window jamb. End caps are not needed in this install.
Outside Mount: You will be installing the brackets on the outside of the window. The width given will be the entire length of the shade, including brackets and motor.
Fabric Width: You will be installing the brackets on the outside of the window. The width and length given will be the entirety of the fabric, excluding brackets and motor.
Outside Mount and Fabric Width is most ideal in a scenario where the client wants a black-out option. While you can use side channels for Inside Mount, the best option to ensure the most light is blocked will always be fabric width.
Control Side
This is the side on which the motor head or the pull chain will be - we default to the right side, but this is entirely dependent on your project!
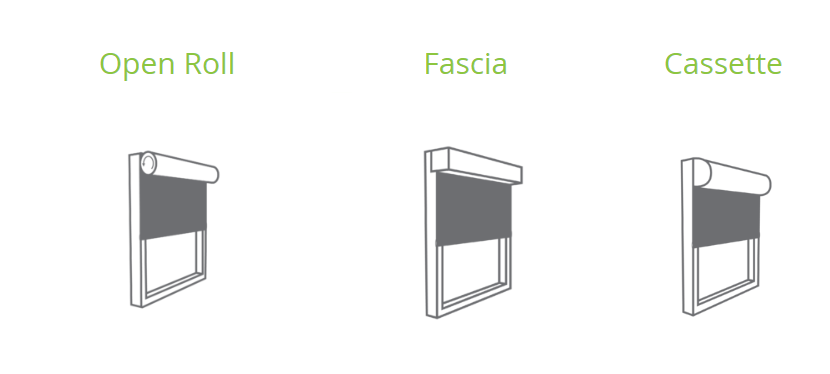
Open Roll: You're able to see the roll and it rolling as the shade moves.
Fascia: This is the most common header type - once the brackets are installed, a sheet of brushed aluminum snaps on the front of the brackets.
Cassette: The shade will come in an entire assembly which snaps up onto the brackets. We offer fabric-wrapped cassette.
Because of the shape of Cassette, this could cause some reverb and make the motors slightly louder.
End Caps
This is where you'll select decorative end caps for your installation. They are not necessary or recommended on inside mount. They can be used if the bracket protrudes past the window jamb, however, may require modification on site in order to snap on.
This is the color of the brushed aluminum on the fascia or the bracket color. This can be found in the digital fabric book or via the Hardware Information pdf found on the Downloads Page.
Fabric
This is the fabric that'll be used on the shade. The fabric offerings can be found within the PowerShades Fabric Book.
By default, shades will always be standard roll. Reverse roll isn't an option in some cases, such as while using a fascia or using a cassette system.
Motor Type and Power Options
PoE: Our true PoE motor that is supplied power and data via Ethernet.
High Voltage: Our motors that require AC wiring by an electrician.
Low Voltage: Our motors that run off of a low voltage (12v) system.
- Hard-wired: The motor will need to be hardwired to a multi-channel power supply.
- Charge w/ Wall Charger: Lithium Ion Motor that lasts about 500 cycles (3-6 months) that must be plugged into a wall outlet to recharge.
- Solar Panel: Lithium Ion Motor that lasts about 500 cycles (3-6 months) that must be charged via Solar Panel.
3 hours of direct sunlight is recommended for consistent charging for Solar Panels!
Hembar Type
Internal / Sealed is the most common hembar type. It's sealed around the bottom of the fabric.
External / Metal is a hembar that attaches to the bottom of the fabric.
Side / Sill channels
CANNOT be used with External / Metal Hembar!
Side / Sill Channels
Side and Sill channels are primarily used to reduce the light gap on inside mount shades, in an instance where a client wants as little light coming through the window. It is expected to have roughly a 3/4" light gap on each side of an inside mounted shade, due to the motor head and bracket.
Attributes
This is where you'll enter the user-friendly information regarding the shade. The shade name is what will display in the PowerShades Dashboard for the end user. Room Name will automatically group the shades in the Dashboard for easy group control with automation. Direction facing is also used for scenes - allowing you to control certain times when the shade is open or closed based on solar position.
Creating an Outdoor Shade
Once you have selected outdoor shade, you will be met with this dialogue box:
Shade Type
Manual Shades: Shades that must be manually controlled via a crank.
Motorized Shades: Shades that can be controlled by RF Remote, over WiFi with an RF Gateway, or using a Third Party Control System and an RF Gateway.
Mount Type
Ceiling: The brackets will be installed to the ceiling.
Wall: The brackets will be installed to a wall.
Measurements
This is where you'll enter your width, height, and crank length (if manual).
Versatile closed cassette system, ideal for almost every situation.
*Available in both round and square cassette
 Heavy Duty:
Heavy-duty closed cassette system with a larger cassette and wider roll tube. Ideal for situations requiring wider shades
(up to 23 feet).
 Open Roll:
Seriously versatile open roll system. Ideal for larger shades.
(up to 23 feet).
Bracket / Frame Color
This is the color of the brackets and/or the frame color. This can be found in the Hardware Information pdf found on the Downloads Page.
Control Side
This is the side in which the motor head or the crank will be - we default to the right side, but this is entirely dependent on your project!
Fabric
This is the fabric that'll be used on the shade. The fabric offerings can be found within the PowerShades Fabric Book.
Hembar Type
Standard Bottom Bar: Most common bottom bar, good for shades under 18'.
Heavy Duty Bottom Bar: A much heavier duty bottom bar is recommended for shades above 18'.
Side Channels
Lightning Track: Locks shade fabric into a side track and minimizes excessive movement of the fabric.
Cable - Wall Mount: Cables are located on each side of the shade to stabilize movement of the shade guided by the hembar. Mounted from a wall.
Cable - Floor Mount: Cables are located on each side of the shade to stabilize movement of the shade guided by the hembar. Mounted from to the floor.
Attributes
This is where you'll enter the user-friendly information regarding the shade. Shade name is what will display in the PowerShades Dashboard for the end user. Room Name will automatically group the shades in the Dashboard for easy group control with automation. Direction facing is also used for scenes - allowing you to control certain times when the shade is open or closed based off solar position.
Accessories
Once you have selected accessories, you will be met with this dialogue box:
2020 Fabric Book (Interior cover ONLY!!): Only the cover of the INTERIOR fabric book, not including any fabric samples.
2020 PowerShades Full INTERIOR Fabric Book: Includes all of the fabrics we offer for indoor shades.
2020 PowerShades Outdoor Fabric Book: Includes all of the fabrics we offer for outdoor shades.
Hardwire Pigtail: Pigtail used to hardwire Low Voltage Hardwired Motors.
External Li-Ion Battery:
Used to provide power to Low Voltage hardwired motors when they're not hardwired to a multi channel power supply.
Multi Channel In-Wall Remote: Used to control up to 15 RF Shades via wall-mounted remote that utilizes a wall plate and is battery powered by two AAA batteries (included).
New Construction 18 Output Power Supply: 18 Output Multi-Channel Power Supply to be used with low voltage hardwired motors - typically placed in a mechanical / server room.
New Construction 9 Output Power Supply: 9 Output Multi-Channel Power Supply to be used with low voltage hardwired motors - typically placed in a mechanical / server room.
PowerShades Demo Unit: A table top desk unit with an open roll shade that includes a single-channel handheld remote.
PowerShades External Wind Sensor: A wind sensor used for outdoor shades that will send an up command to paired shades once it has reached a threshold MPH set by the user.
PowerShades Gateway:
The "hub" that allows you to connect RF Shades to the internet - allowing them to be controlled via WiFi.
Single Channel In-Wall Remote: Used to control a single RF Shade via handheld remote via wall mounted remote that utilizes a wall plate and is battery powered by two AAA batteries (included).
Solar Panel - Micro USB: Used to trickle charge our Low Voltage Lithium Ion Motors with a Micro USB charger.
Wall Charger: Used to charge our Low Voltage Lithium Ion Motors via DC.
Our ordering process team will ensure the correct Solar Panels and Wall Chargers are sent out for your correlating shades!