Cassette PoE Shade Installation
Cassette PoE Installation Guide
This is a comprehensive install guide for our Cassette PoE system. If you encounter any issues during your install process, please reach out to us at 417.533.0504
TOOLS
- Drill
- 1/8" Drill Bit
- 1/4" Drive
- Tape Measure
- Pencil / Pen
- Level
- Flathead Screwdriver
- Phillips Screwdriver
- Impact
- 6" Extension
- Laser Level
- Spring-Loaded Center Punch
- Zip-Tie and Mounts

VERIFY SHIPMENT
- Wood Screws (4 per shade)
- Cassette Brackets
- Cassette Endcaps
- Side Channels (2 per shade, if ordered)
- Sill Channels (1 per shade, if ordered)
- Extra Wood Screws (if side channels and sill channels were ordered)
These accessories will be in the box with each individual shade.
Your shades will also come with the accessories you ordered. There will be a sticker indicating which box has the accessories - it is labeled "hardware enclosed."
HARDWARE INSTALLATION VIDEO
Hardware Installation
STEP 1: DRY FITTING YOUR SHADE AND INSTALLING ENDCAPS
Once your shades are unpacked and ready to be installed, it's important you dry-fit your shades. This allows you to center up your shade in your window sill or above the window!
STEP 2: CONFIRMING MEASUREMENTS
Once your shade is dry fit assembled, we need to confirm the measurements from bracket to bracket with the shade inserted. Take this measurement, use a tape measure, and center the measurement in the window sill (if inside mount) or above the window opening (if outside mount or fabric width), and mark the edges of each bracket with a pen/pencil
STEP 3: PRE-DRILLING AND INSTALLING SCREWS
According to the marks you just made from the dry fit shade, align the brackets and mark the location of the screw holes on the bracket. You can do this with a pen or pencil, but we recommend using a spring-loaded center punch to help with pre-drilling.
Using a drill (or impact) pre-drill all the holes necessary for the brackets, using a 1/8" drill bit.
Once you have pre-drilled, install the brackets and screws - fastening them with the 1/4" drive. Using a 6" extension will come in handy - it can be difficult to fasten the screws as the brackets will block your drill/impact.
STEP 4: MOUNTING THE SHADE
Powering Your PoE Shades
Our PoE Shades require 7W max using an IEEE 802.3AF-2003 PoE switch. You will need to use the T568b wire standard. You will need CAT 5 or newer. Since each motor has it's own individual IP address, dual shades will require two separate drops.
WIRE PINOUT
| RJ45 Pin Position | 1 | 2 | 3 | 4 | 5 | 6 | 7 | 8 |
|---|---|---|---|---|---|---|---|---|
| Correct Wiring | (TX+) Purple |
(TX-) Brown |
(RX+) Green |
(DC-) Red |
(DC-) Black |
(RX-) Yellow |
(DC+) Orange |
(DC+) Blue |
Once the shades have been plugged in to a PoE Switch (or PoE Injector) you can proceed to the next step!
PoE Motor Setup
This guide follows setup using the PowerShades Dashboard, which is the recommended way to set up your PoE Shades. You will use your login from the dealer portal in order to access your properties.
BEFORE YOU BEGIN
Before we start the setup, you will need to give yourself (or anyone who will need it) access to the property.
STEP 1:
Once you have logged in, you will need to navigate to the Admin tab at the top of the page.
STEP 2:
Click "Manage" next to the user then, "Property Permissions" in the dropdown menu.
STEP 3:
Select the properties you would like to assign to this user by clicking the checkbox next to them.
At this point, create the "user" account for the owner of the property. This can be done by clicking "New", then select "New User."
You will need to fill out their details, such as email address and password. You will also need to select the property(s) you would like to attach them to.
CORRECTING LIMITS
Limits are set during production but may need to be adjusted.
STEP 1:
Log into the PowerShades Dashboard. If you have multiple properties, make sure you have the correct one selected. You can change the property by clicking the property name under "Property", and selecting the correct property.
STEP 2:
STEP 3:
STEP 4:
A new dialog box will pop up labeled "Shade Name Configuration". On the right side of this dialogue box, you will see all of the limit correction options. Verify the shade's top and bottom limits by using the commands on the left.
STEP 5:
STEP 6:
STEP 7:
PoE FAQ
MY SHADE IS ROLLING IN THE WRONG DIRECTION.
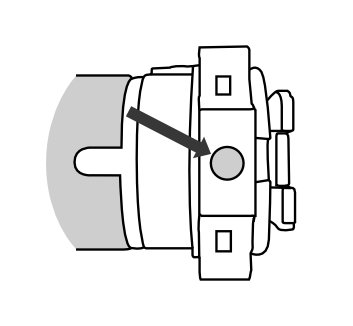
WHERE IS THE BUTTON ON THE MOTOR?
It can be found on the motor side where the pigtail is located.
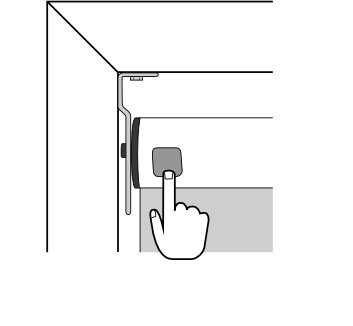
 WHAT DOES THE BUTTON DO?
Good question! It's not used during installation. You can use it for a couple of different features:
Pressing and releasing the button will jog up or down if the limits are set.
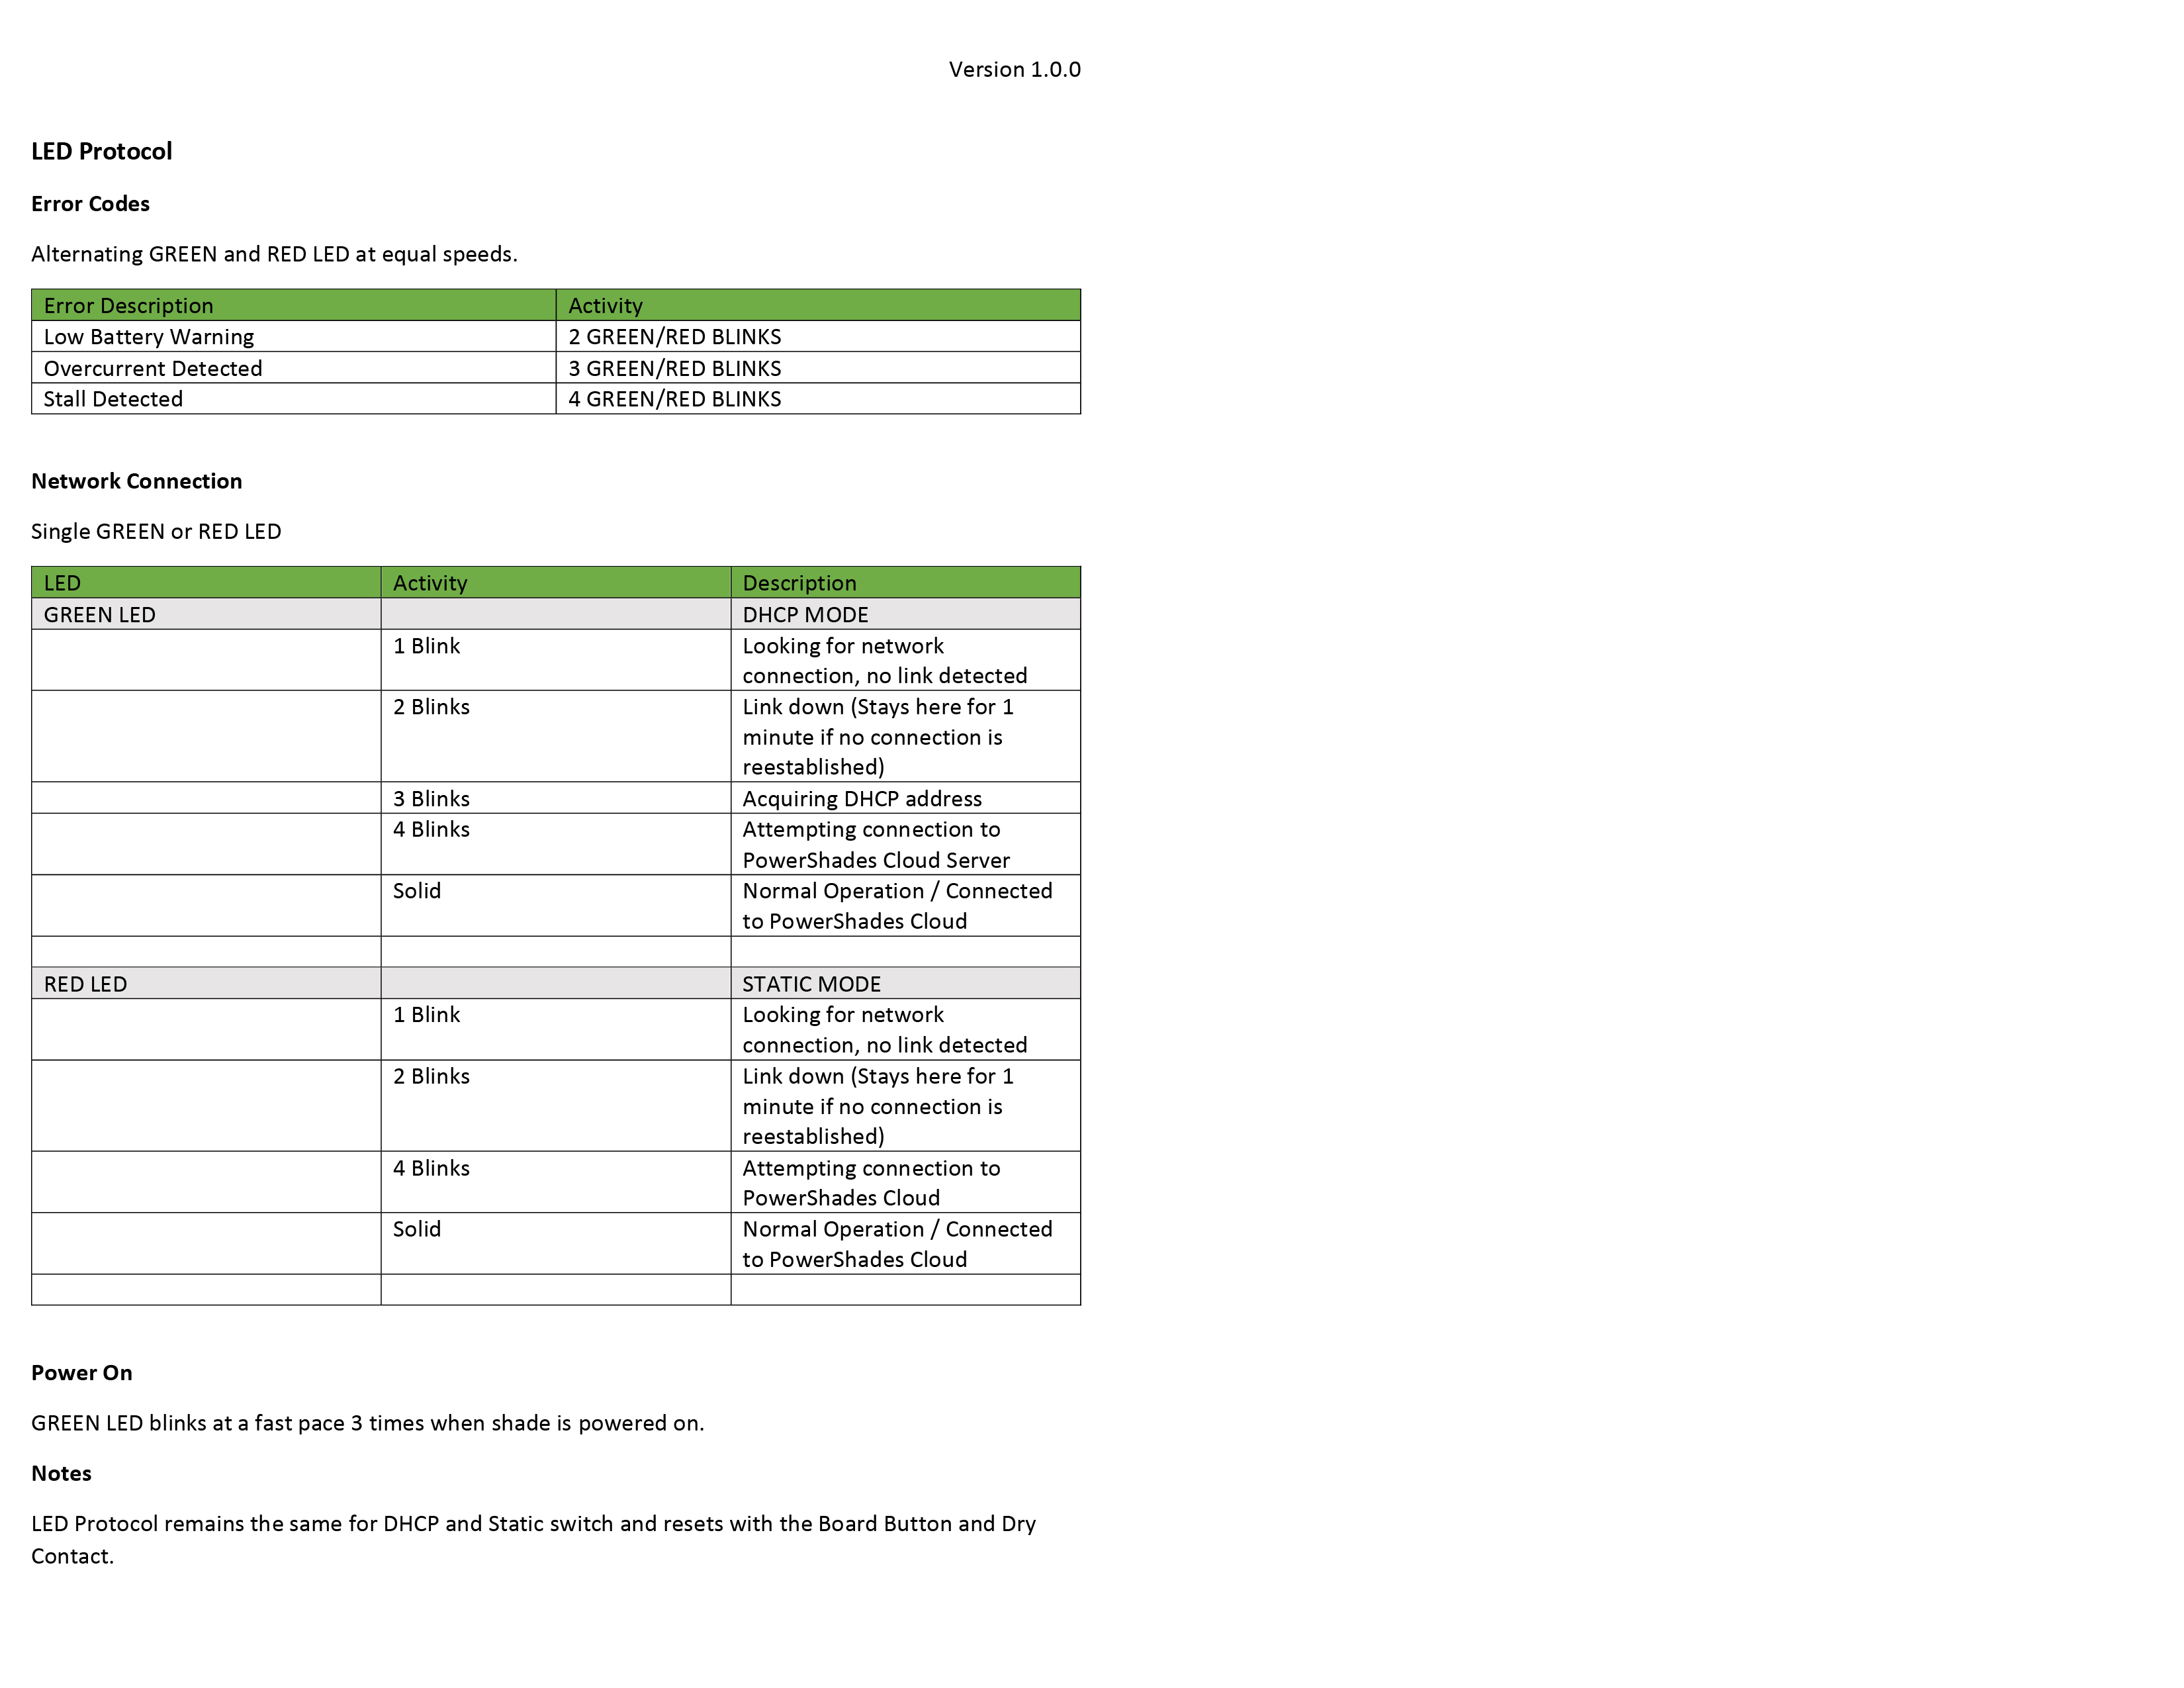
Holding the button for 1 second will indicate which IP mode it's in - DHCP or Static.
Holding it for 3 seconds will cause the LED to begin alternating between red and green. This allows you to change the IP mode. You will need to press the button until it turns either red for static, or green for DHCP.
Holding it for 10 seconds will cause the LED to begin flashing green. Letting go will reboot the motor.
Holding it for greater than 30 seconds will cause the LED to begin flashing red. Letting go will factory reset the motor.
WHAT IP MODE ARE POE MOTORS IN BY DEFAULT?
They are set in DHCP mode by deafault. If changed to static, the default IP address is 192.168.1.240.
HOW DO I FIND MY POE SHADE'S PRIVATE IP ADDRESS?
If you're planning to set the shades up locally, you will need to use PowerShades Config.NET to find(and change) the Private IP address(es).
CAN I SET UP A POE SHADE LOCALLY?
Yes! You will need to follow the PowerShades Config.NET guide. It operates practically the same as the dashboard, just a little less intuitive. It can only be used on Windows.
WHAT ARE THE LED BLINK CODES? WHAT DO THEY MEAN?
-100 Firmware
| Activity | Description | Troubleshooting |
|---|---|---|
| Off | Hardware is asleep. | N/A |
| 1 Blink | No Ethernet link, attempting to initiate connection | Confirm your PoE cable is plugged into a known good port. |
| 2 Blinks | Ethernet link established. Waiting for DHCP lease if applicable | If using DHCP, confirm you have free leases available within the DHCP range. |
| 3 Blinks | IP Address assigned | N/A |
| 4 Blinks | Waiting for DNS to resolve | If on static, confirm the information entered. Ensure the motor is on the correct subnet. |
| 5-9 Blinks | Normal operation | N/A |
-100 Firmware
Shimming and You
You'll know your shade is telescoping (tracking) whenever it's not going down straight. You will also be able to see a "cone" on one side, displayed below. It may move over to the left or right during operation.
This can occur from several factors; irregularities in the fabric, irregularities in the tube, unsquare windows, unlevel brackets. Telescoping isn't covered in the warranty - it can be fixed quickly on site. We recommend you shim any shades that are tracking during installation.
STEP 1.
Roll the shade all the way down to its bottom limit. Put the shade in limit setting mode by holding the DOWN and STOP buttons at the same time for 5 seconds. This will allow you to roll the shade past its bottom limit.
STEP 2.
Roll the shade down enough to expose the aluminum tube. You may already have stickers from the factory adjusting for fabric irregularities.
 STEP 3.
Shim the side that is coning. If your shade is moving over to the right, shim the left. If it moving to the left, shim the right. A sticker or tape (painters, scotch, etc.) works the best.
STEP 4.
Roll the shade up to test for tracking. This can be done by holding the up button for a few seconds. It's important you stop the shade before it reaches the top, as it will not stop rolling.
STEP 5.
Once the shade is tracking normally, move the shade to the desired bottom limit. Hold the DOWN and STOP button for two seconds to re-set the bottom limit - the motor will jog twice and beep three times.
Installing Side Channels
STEP 1.
Measure the relaxed distance of the hembar from the window and mark the measurement.
STEP 2.
Align the center of the side channel to the relaxed distance of the hembar. Mark the screw holes in the side channels to ensure the side channel is installed correctly.
STEP 3.
Using these marks, pre-drill into the window jamb using a 1/8" drill bit. Once done, fasten the side channels to the window jamb using the included screws and 1/4" drive.
STEP 4.
Run the shade up and down to verify operation. Make sure the shade is not getting caught up in the track.
Dashboard Automation Setup
If you're not using a third-party driver for this property, you can use the dashboard's automation to set schedules.
STEP 1.
Navigate to the "Automate" tab on the PowerShades Dashboard.
STEP 2.
Groups have automatically been created based on the "rooms" that were entered on the Dealer Portal.
You can also edit or delete groups by clicking the correlating buttons on the right side of the page.
On the New Group dialogue box, you're able to choose "filters" based on the attributes tied to the shades (direction, floor, etc). You are able to select multiple options under an option by pressing CTRL while left-clicking (Windows) or pressing CMD ⌘ while left-clicking (Mac).
STEP 3.
Navigate to the Scenes tab. These are your "commands" for the shades to follow, but not the schedule at which they perform said command.
On the new dialogue box that opens named "New Scene," you will be able to add the scene variables. You can choose which group is affected and the percentage of light they let in. (100% is open, 0% is closed). Tilt is not currently utilized.
STEP 4.
Navigate to the Schedules tab.
is used to enable and disable all schedules.
A dialogue box named "New Schedule" will open, allowing for customization of the schedule. You are able to name the schedule, choose which scene you would like to trigger and when. You're also able to select the months and days of weeks that it affects.
Related Articles
Fascia PoE Shade Installation
Fascia PoE Installation Guide This is a comprehensive install guide for our Fascia PoE system. If you encounter any issues during your install process, please reach out to us at 417.533.0504 TOOLS Required Tools: Drill 1/8" Drill Bit 1/4" Drive Tape ...Cassette RF Shade Installation
Cassette RF Installation Guide This is a comprehensive install guide for our Cassette RF system. If you encounter any issues during your install process, please reach out to us at 417.533.0504 TOOLS Required Tools: Drill 1/8" Drill Bit 1/4" Drive ...Open Roll PoE Shade Installation Guide
Open Roll)PoE Shade Installation Guide This is a comprehensive install guide for our Open Roll PoE system. If you encounter any issues during your install process, please reach out to us at 417.533.0504 TOOLS Required Tools: Drill 1/8" Drill Bit 1/4" ...Outdoor Shade Installation Guide
OUTDOOR SHADE INSTALLATION GUIDE Introduction Thank you for your purchase! This will guide you through the installation process. If you ever need any help throughout your installation, feel free to reach out to us at (417) 553-0504 or email us at ...Fascia RF Shade Installation
Fascia RF Installation Guide This is a comprehensive install guide for our Fascia RF system. If you encounter any issues during your install process, please reach out to us at 417.533.0504 TOOLS Required Tools: Drill 1/8" Drill Bit 1/4" Drive Tape ...