Outdoor Shade Installation Guide
OUTDOOR SHADE INSTALLATION GUIDE
Introduction
Thank you for your purchase! This will guide you through the installation process. If you ever need any help throughout your installation, feel free to reach out to us at (417) 553-0504 or email us at support@powershades.com. We are here to help!
Cassette
Quick Steps:
STEP 1. Remove packaging and ensure that you have all brackets and hardware.
STEP 2. Mount your brackets

It is absolutely vital that your brackets are level and plumb!
STEP 3. Once the brackets are installed, lift the complete box assembly onto the brackets and fasten with the proper set screws.
STEP 4. Once the unit is installed, mount the relative track or cable guides.
Wall Mount
Brackets
Step 1. Use appropriate fasteners to mount the wall brackets to structural supports. Mount brackets 2'' to 6'' from the cassette ends. If 4 brackets are included then mount them 4'' to 8'' from the outer brackets. Make absolutely sure that all brackets are on a level line and are are plumb. Note that all weight is held towards the ends there is no need for brackets towards the middle. Also, When shade is under 108" wide only 2 brackets are necessary. When the shade is wider than 108", then 4 brackets will be necessary.
Step 2. First make sure that the set screws on the brackets are turned out. Then, lift the case up onto the hook on the back of the brackets. Then rotate case up to flush with the bracket and secure with the set screws on the mounting brackets.
Ceiling Mount
Brackets
Step 1. Ensure top corners of opening have a sharp 90° corner, if not, there may be interference or misalignment with the cassette and tracks. Use appropriate fasteners to mount the ceiling brackets to structural supports. Mount brackets 2’’ to 6’’ from the opening ends. If 4 brackets are included then mount them 4’’ to 8’’ from the outer brackets. Make absolutely sure that all brackets are on a level line and are are plumb. Note that all weight is held towards the ends there is no need for brackets towards the middle. Also, When shade is under 108” wide only 2 brackets are necessary. When the shade is wider than 108”, then 4 brackets will be necessary.
Step 2. First make sure that the set screws on the brackets are turned out. Then, lift the case up onto the hook on the back of the brackets. Then rotate case up to flush with the bracket and secure with the set screws on the mounting brackets.
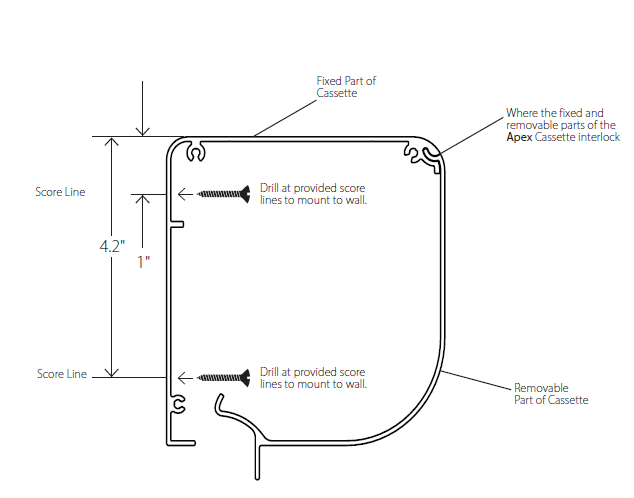
Heavy-Duty Cassette
Wall Mount
 The Heavy-Duty Cassette must be mounted directly to the wall by drilling directly through he back of the fixed side of the cassette. Guidelines are scored in the extrusion on the fixed side of the cassette where indicated.
The Heavy-Duty Cassette must be mounted directly to the wall by drilling directly through he back of the fixed side of the cassette. Guidelines are scored in the extrusion on the fixed side of the cassette where indicated. Ceiling Mount
The Heavy-Duty Cassette must be mounted directly to the ceiling by drilling directly to the ceiling by drilling directly through the top of the fixed side of the cassette. Guidelines are scored in the extrusion on the fixed side of the cassette where indicated.
Open Roll
Brackets
Wall Mount
Ceiling Mount
Pocket Ceiling Mount
Lightning Track Installation
STEP 1. Use appropriate fasteners to mount the wall brackets to structural supports. Mount brackets 2" to 6" from the case ends. If 4 brackets are included then mount them 4" to 8" from the outer brackets. Make absolutely sure that all brackets are included then mount them 4" to 8" from the outer brackets. Note that all brackets are on a level line and are plumb. Note that all weight is held toward the ends there is no need for brackets toward the middle. Also, when a Shade is under 108" wide, only 2 brackets are necessary. When the shade is wider than 108", then 4 brackets will be necessary.
STEP 2. Disassemble the track by removing the screws holding the removable extrusion cover and removing the plastic zipper track on the inside. Make sure the bottom cap is installed before proceeding.
STEP 3. Position the larger fixed track up against the indent in the box. The outside of the track should be exactly flush with the end of the box. Notches for mounting from the front or side have been provided to guide fastener installation. Notches for mounting from the front or side have been provided to guide fastener installation. Use appropriate fasteners to secure the track of the installation location.

Make sure the tracks are mounted level and plumb in all directions. As a final check make sure that the left and right tracks are the same distance apart from top to bottom within 1/8".
STEP 4. Angle the zipper track up into and behind the upper most spring. The top of the track is the side with the notches cut out. Then slide it up into the zipper on the shade material until it is pushed all the way up to the track top cap. Finally use a flat head screw driver or the flat aluminum credit-card-size card found in the installation hardware bag to compress the springs and make sure they are all pushing back on the plastic track.
STEP 5. Place the removable covers onto the fixed track and hold into place while securing with the retaining screws.
DO NOT USE POWERED SCREW DRIVER AS THE STAINLESS STEEL SCREW WILL STRIP THE ALUMINUM PROFILE!
Cable Guide Installation
STEP 1. Run the larger crimped end of the guide cable up through the hole in the weight bar. Then slide over
the guide cable bracket in the case or attached to the motor end plate.
STEP 2. Secure either the cable guide floor mount brackets or the cable guide wall mount brackets using appropriate fasteners. Make sure that they are secured at a location such that the cables will be plumb in both directions and parallel to each other. Note that the wall mount bracket can be installed either on the wall or inside the columns as well as be flipped upside down if desired.
STEP 3. Install the tensioners onto the mounts making sure that they are threaded out as much as possible so that there will be thread available to tension the cables. Cut the cables such that they are the same length so that they will just extend to the bottom of the hole in the tensioner.
STEP 4. Secure either the cable guide floor mount brackets or the cable guide wall mount brackets using appropriate fasteners. Make sure that they are secured at a location such that the cables will be plumb in both directions and parallel to each other. Note that the wall mount bracket can be installed either on the wall or inside the columns as well as be flipped upside down if desired.
Verify Spring Tension and Upper Limit
Related Articles
Open Roll PoE Shade Installation Guide
Open Roll)PoE Shade Installation Guide This is a comprehensive install guide for our Open Roll PoE system. If you encounter any issues during your install process, please reach out to us at 417.533.0504 TOOLS Required Tools: Drill 1/8" Drill Bit 1/4" ...Open Roll RF Shade Installation Guide
Open Roll RF Shade Installation Guide This is a comprehensive install guide for our Open Roll RF system. If you encounter any issues during your install process, please reach out to us at 417.533.0504 TOOLS Required Tools: Drill 1/8" Drill Bit 1/4" ...Fascia PoE Shade Installation
Fascia PoE Installation Guide This is a comprehensive install guide for our Fascia PoE system. If you encounter any issues during your install process, please reach out to us at 417.533.0504 TOOLS Required Tools: Drill 1/8" Drill Bit 1/4" Drive Tape ...Cassette PoE Shade Installation
Cassette PoE Installation Guide This is a comprehensive install guide for our Cassette PoE system. If you encounter any issues during your install process, please reach out to us at 417.533.0504 TOOLS Required Tools: Drill 1/8" Drill Bit 1/4" Drive ...Cassette RF Shade Installation
Cassette RF Installation Guide This is a comprehensive install guide for our Cassette RF system. If you encounter any issues during your install process, please reach out to us at 417.533.0504 TOOLS Required Tools: Drill 1/8" Drill Bit 1/4" Drive ...