Control 4 Driver Guide
CONTROL 4 DRIVER GUIDE
Introduction
Thank you for your purchase! This will guide you through the installation process. If you ever need any help throughout your installation, feel free to reach out to us at (417) 553-0504 or email us at
support@powershades.com. We are here to help!
Preface
It's important that you have went through the entirety of the pairing process (pairing remotes, verifying limits, and pairing the shades to the gateway) before you proceed with the Control 4 Driver!
This guide begins assuming you've already entered your project information.

The PowerShades Control 4 Driver must be downloaded in order to proceed with setup!
Setup

If the driver has never been added to Control 4, make sure you do so by adding it via Drivers > Add or Update Driver > Add Correlating Driver(s)
STEP 1. You can access the drivers via search on the right side of the screens under "items"
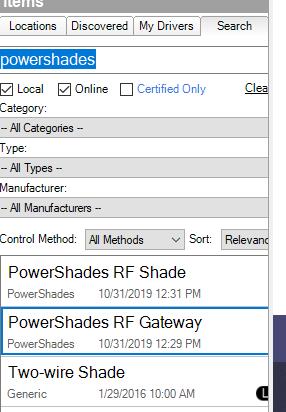
STEP 2. Add appropriate number of devices and the correlating drivers (RF Gateway and RF Shades or PoE Shades). Rename the channel of the RF Shades to the appropriate descriptive name for the shade.

If equipped with RF shades, you must use both the RF Gateway and RF Shade Driver!
STEP 3. For PoE Motors and RF Gateway, set the IP Address under properties. The IP address can be found in the PowerShades Dashboard or PowerShades Config.NET.

STEP 4. Navigate to Actions and execute "Restart Driver". The network status for the device should change to ONLINE within 30 seconds.

If you are using PoE Shades for this project, skip to Step 6.
STEP 5. Bind the RF Gateway channel to the RF Shade. Under Connects, select the RF Gateway. Drag the appropriate RF_CHANNEL_XX control output to the appropriate PS_RF_CHANNEL Input Device (RF Shade).

It is vital that you program the Channels in correlation with the RF Gateway. The channels can be found in the
PowerShades Dashboard > Devices > RF Gateways > Edit... as shown below.
STEP 6. Test shade moment. Use the control-control dialogue (double-click on Shade) to open/close the shade and move it to a target level.

Related Articles
RTI Driver Guide
RTI DRIVER GUIDE Introduction Thank you for your purchase! This will guide you through the installation process. If you ever need any help throughout your installation, feel free to reach out to us at (417) 553-0504 or email us ...Savant Driver Guide
SAVANT DRIVER GUIDE Introduction Thank you for your purchase! This will guide you through the installation process. If you ever need any help throughout your installation, feel free to reach out to us at (417) 553-0504 or email us ...ELAN Driver Guide
ELAN DRIVER GUIDE Introduction Thank you for your purchase! This will guide you through the installation process. If you ever need any help throughout your installation, feel free to reach out to us at (417) 553-0504 or email us ...Crestron Driver Guide
CRESTRON DRIVER GUIDE Introduction Thank you for your purchase! This will guide you through the installation process. If you ever need any help throughout your installation, feel free to reach out to us at (417) 553-0504 or email us at ...URC Driver Guide
URC DRIVER GUIDE Introduction Thank you for your purchase! This will guide you through the installation process. If you ever need any help throughout your installation, feel free to reach out to us at (417) 553-0504 or email us ...